The first image is how the website will appear as you enter it. The second image is a representation of how each of the buttons will look as you hover over them. I still intend to do something more with the title and the typography as it's a bit messy.
Tuesday 27 November 2012
Monday 26 November 2012
Design for Web // Creating the Buttons
As I have chosen the above scamp to make into a website I have started to make the images. I want the website to appear first in black and white and then when you roll over the images they will fill with a harlequin or other related circus pattern.
Pink and green aren't particularly colours that people relate with the circus so I have been playing around with a few different colour ways to see which works best.
Design for Web // Scamps
Here are my initial scamp designs for my 'history of the circus' website. Considering the nature of circus's I want my website to be quirky and to take a format that is a bit out of the ordinary.
Each of the icons in the design below would fill with colour or a pattern as you hovered over them.
In this design, If I could, then I would like the trapeze artist to swing a little as you hover over the button and each of the other buttons would come to life too, for example the eye could open.
This is a more basic design where when hovered over the sign posts they will fill with colour.
Wednesday 21 November 2012
Design for Web // Workshop
Possible Content it Website:
Text
Image
Animation
Maps
Music
Video
To view images in a gallery on a website there are different ways of doing this. A good website is http://lokeshdhakar.com/projects/lightbox2/
Design for Print // Final Critique
Feedback
Strengths:
Clear & to the point content.
A good focus on the key areas of print.
Consistent style throughout. Cmyk is a nice touch.
Good title, shows personality and gives insight - good for student audience.
Use of grid for layout purposes is effective.
Area's for Improvement:
Slightly more content for the books and visual images
Layout of type
Body copy is hard to read
Use spell check
CMYK triangle is a bit random
Use of grid for layout purposes is effective.
Area's for Improvement:
Slightly more content for the books and visual images
Layout of type
Body copy is hard to read
Use spell check
CMYK triangle is a bit random
Tuesday 20 November 2012
Design for Print // OH CROP! Design for Print Manual
Below is the development of my print manual. I have used a similar layout here as I did with the colour manual. Instead of RGB I have used CMYK to give it a slight difference. This manual is also 20 x 20 cm instead of 15 x 15 cm like the colour manual. As this is the first time I've properly used inDesign by myself I am happy with the result.
Design for Print // Full Print Manual
This is my chosen front cover design for the print manual, I have chosen it because it's humorous and I think the layout generally looks the best out of all the designs. The crop symbol is also relevant whereas the other shapes are just a bit random.
I have experimented with different type faces and used low opacity CMYK colours in each design. I think the serif typeface works better than the sans serif beacuse it's more traditional and to me has connotations of traditional printing methods.
I think the design below looks more effective on screen than printed, when printed the colours are a bit distorted and unflattering.
Monday 19 November 2012
Design for Print // Colour Manual - Designing the inside.
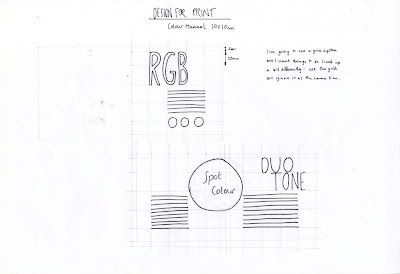
For my print and colour manuals I have decided to go for a bit of an odd layout, everything is designed in a grid but slightly goes against the grid at the same time. I think when all the pages are put together that it works well.
I have designed my manual to be a quick reference tool, as when I want to find something out I like to get straight to the point.
Design for Print // Colour Manual - Front Cover Designs
So far I've done many design sheets but I think it's hard to represent on a design sheet what you actually want the design to look like, it's helpful for layouts but for choosing colours and fonts I decided to move onto the computer.
Saturday 17 November 2012
Friday 16 November 2012
Design for Print // Paper Sizes
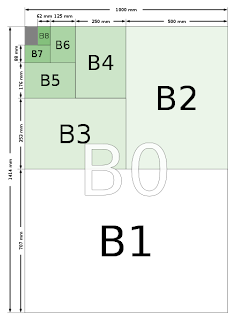
Many paper size standards conventions have existed at different times and in different countries. Today there is one widespread international ISO standard (including A4, B3, C4, etc.) and a local standard used in North America (including letter, legal, ledger, etc.). The paper sizes affect writing paper, stationery, cards, and some printed documents. The standards also have related sizes for envelopes.
In the UK the most commonly used paper format is ISO standard however there are many more out there.
In the UK the most commonly used paper format is ISO standard however there are many more out there.
| Format | A series | B series | C series | |||
|---|---|---|---|---|---|---|
| Size | mm × mm | in × in | mm × mm | in × in | mm × mm | in × in |
| 0 | 841 × 1189 | 33.11 × 46.81 | 1000 × 1414 | 39.37 × 55.67 | 917 × 1297 | 36.10 × 51.06 |
| 1 | 594 x 841 | 23.39 × 33.11 | 707 × 1000 | 27.83 × 39.37 | 648 × 917 | 25.51 × 36.10 |
| 2 | 420 × 594 | 16.54 × 23.39 | 500 × 707 | 19.69 × 27.83 | 458 × 648 | 18.03 × 25.51 |
| 3 | 297 × 420 | 11.69 × 16.54 | 353 × 500 | 13.90 × 19.69 | 324 × 458 | 12.76 × 18.03 |
| 4 | 210 × 297 | 8.27 × 11.69 | 250 × 353 | 9.84 × 13.90 | 229 × 324 | 9.02 × 12.76 |
| 5 | 148 × 210 | 5.83 × 8.27 | 176 × 250 | 6.93 × 9.84 | 162 × 229 | 6.38 × 9.02 |
| 6 | 105 × 148 | 4.13 × 5.83 | 125 × 176 | 4.92 × 6.93 | 114 × 162 | 4.49 × 6.38 |
| 7 | 74 × 105 | 2.91 × 4.13 | 88 × 125 | 3.46 × 4.92 | 81 × 114 | 3.19 × 4.49 |
| 8 | 52 × 74 | 2.05 × 2.91 | 62 × 88 | 2.44 × 3.46 | 57 × 81 | 2.24 × 3.19 |
| 9 | 37 × 52 | 1.46 × 2.05 | 44 × 62 | 1.73 × 2.44 | 40 × 57 | 1.57 × 2.24 |
| 10 | 26 × 37 | 1.02 × 1.46 | 31 × 44 | 1.22 × 1.73 | 28 × 40 |
1.10 × 1.57
|
Design for Print // Different types of Book Binding
Saddle Stitch Binding
Saddle Stitch Binding | DYI Saddle Stitch Binding | Saddle Stitch Book Binding
A book stapled at the center two or three times is nothing but saddle stitched. The saddle refers to the center of the folded papers where it is stapled, which is why saddle stitch binding is one of the most common an popular methods of book binding.
You can also staple from one side of the book if you don't prefer center stapled books. A long arm stapler is enough to start saddle stitching your books. Saddle stitch book binding is a popular method because of its combination of ease as well as overall effectiveness. If you are just getting started with binding books then this is a pretty good style
Paperback Binding
Paperback Book Binding | Book Bindings | Book Binding | Book Binding Systems
Paper back binding is fairly simple, and you can bind paperback books at home after learning the process. Many people have found this useful and use this book binding style to do it by themselves.
Many authors who want to self publish but are not able to afford publishing houses, as well as book binding hobbyists who want to bind their own books, are using the paperback book binding method to bind their own books at home. Paperback binding is one of the more simple dyi book binding methods.
Hardcover Binding
Hardcover Binding | Hardcover Book Binding | DYI Hardcover Book Binding | Book Binding
Hardcover binding can also be done at home but it requires more effort. The different steps involved are making signatures, poking holes in the signatures, sewing (probably the hardest part of this style of book binding), making the cover, and finally attaching the cover to the stack of signatures.
The result of this style of binding is well worth the effort, as the final product is beautiful
Different types of Book Binding according to http://www.powis.com/resources/learn/binding_types.php
Hardcover
The Hardcover book features a hard external cover (called a “case” by the binding industry). These are usually covered with cloth, leather, or textured paper. On some books, the spine has a different covering material than the front and back panels. This is called quarter-binding and is very popular in the publishing industry.
Hardcover binding is a good choice for publishing, photobooks, yearbooks, dissertations, theses, high-end presentations, and proposals.
The Fastback Hardcover System and Photobook Production Cell are two hard cover binding solutions that Powis offers. The Fastback Hardcover System lets anyone make hard cover books quickly without expensive bindery equipment. The Photobook Production Cell is designed specifically for people who need to bind glossy paper.
| |
Tape Binding
Tape binding uses a thermoplastic adhesive on a strip to bind books. In technique, it is similar to perfect binding, where the individual pages are glued to the book spine. Tape binding is a good choice for office documents, review books, or other presentations. Powis makes a number of tape binding strips, from the sturdy Super Strip to the attractive Comp Strip to the Lx-Strip, which is used with the Fastback 9 binding machine. We also make thePhotoPro strip which is designed for use with the Photobook Production Workcell.
| |
Perfect Binding
Perfect binding is a punchless binding method that works by fastening the book block to the cover spine. It is often used for softcover books and is most familiar to people in the form of paperback books. It is also called adhesive binding, or unsewn binding. The Powis Perfectback Strips make perfect binding on an on-demand basis as easy to do as any office document binding job.
| |
Sewn Binding
Sewn binding is usually used in conjunction with hard cover binding. The book block, or sections of the book block are sewn together prior to the addition of the cover. This makes for a very sturdy book. The biggest disadvantage to sewn binding is that it requires specialized, expensive equipment, and, when done on a custom basis, is a slow process. As an alternative to sewn binding, Powis has developed StitchFree™ technology, which is capable of producing books that rival sewn and wire-stitched books in binding strength.
| |
Wire Stitching
Wire stitching is a form of binding that uses wire staples to bind sheets together. Wire stitching can either be used as side stitching, or saddle stitching. Side stitching is used for thin books that are usually then either covered with a hard cover, or a tape strip. Saddle stitching binds the sheets together through the fold in the center of several pages. It is the form of binding commonly used on comic books and magazines.
| |
Plastic Comb Binding
Also called GBC binding, plastic comb binding is a punch-and-bind system that is used for many office documents. Its main advantage is that it is inexpensive and easily edited. Its disadvantage is its appearance and the security of the final book. Also, like other punch-and-bind systems, it requires more labor than tape binding.
| |
Wire-O Binding
Wire-O is a punch-and-bind system that is similar in technique to the plastic comb binding, but resembles wire spiral binding in appearance.
| |
Velobinding
Velobind is a punch-and-bind system that uses a two-part binding element. First the paper is punched with a series of tiny holes. One half of the binding element consists of a plastic strip with evenly spaced plastic spikes on one side. The other half of the binding element is a plastic strip with evenly spaced holes that match the punches. The spikes are pushed through one side of the paper and then fed through the plastic strip with holes. The ends of the spikes are melted off, creating the bind. A Velobound cannot be edited without rebinding.
| |
Spiral Binding
Spiral binding—as its name suggests—is a punch-and-bind system that uses a plastic or metal spiral wire that is wound through punched holes on the binding edge. It is the type of binding most often used for school notebooks and steno pads.
|
Subscribe to:
Posts (Atom)


